Freeze Your Sourdough Bread the Right Way
- Mary Chadd
- Jun 26, 2025
- 4 min read

Sourdough bread is a delightful treat, known for its tangy flavor and chewy texture. However, baking a fresh loaf can often yield more than you can eat in one sitting. Freezing is a smart solution to ensure you can enjoy that homemade goodness later. When done correctly, you can extend the shelf life of your sourdough without compromising its quality.
Freezing Sourdough Bread
Freezing sourdough bread is not just about tossing it in the freezer; there are specific steps to ensure it remains fresh and delicious. The key is to preserve its texture and flavor, allowing you to enjoy it as if it just came out of the oven. Here is a detailed breakdown of the process.
Choosing the Right Bread
When it comes to freezing, not all sourdough loaves are created equal. The best candidates for freezing are those that have been freshly baked and cooled completely. Resist the temptation to freeze bread that is still warm, as moisture can create ice crystals, leading to freezer burn.

Make sure to examine the loaf for any signs of damage or excess moisture before freezing. A properly baked loaf will have a firm crust and not feel overly moist. This quality is your assurance that the bread will hold up well during the freezing process.
Preparing Your Sourdough for Freezing
Before placing the bread in the freezer, take a few essential steps to prepare it properly. Start by slicing the bread if you plan to use it in portions. This allows you to take out only what you need without defrosting the entire loaf.
Slice it Right: Using a serrated knife, cut the bread into slices about one inch thick. This size is easy to defrost and is ideal for sandwiches or toast.
Wrap It Up: Use plastic wrap, aluminum foil, or freezer bags to wrap the bread tightly. Make sure no air can reach the bread to prevent freezer burn. You can also use freezer paper for added protection.
Label and Date: Don’t forget to label your packages with the date you froze them. This will help you keep track of how long they’ve been stored. Most sourdough bread can last up to three months in the freezer if sealed correctly.

By taking these steps, you maximize your chances of enjoying perfectly preserved sourdough bread later.
How Do You Defrost Frozen Sourdough Bread?
After successfully freezing your sourdough, you might wonder how to defrost it properly to maintain its quality. Here are a few simple yet effective methods:
Room Temperature Thawing: The easiest method is simply to remove the bread from the freezer and leave it on the counter to thaw. Depending on the loaf size, it may take 1-3 hours to fully defrost. This method helps retain moisture and texture.
Oven Method: If you’re short on time, you can place the frozen loaf directly in a preheated oven at 350°F (175°C) for about 15-20 minutes. This method will warm the bread and restore its crustiness. Be sure to add a little water in a pan at the bottom of the oven to create steam, which helps maintain moisture.
Toaster Option: For individual slices, use a toaster. Simply toast the frozen slice without thawing first. This method is quick and gives you a nice, crispy texture.

By following these simple methods, you can easily restore your bread to its original glory, ensuring it tastes as delicious as the day it was baked.
Tips for Best Results
To get the most out of your sourdough bread freezing experience, consider these additional tips:
Avoid Re-freezing: Once bread has been thawed, do not refreeze it. This can lead to a loss of quality and texture.
Use Quality Packaging: Invest in high-quality freezer bags or vacuum sealers for the best protection against air and moisture.
Don’t Overload the Freezer: Make sure there is enough space for air circulation in your freezer. Overcrowding can lead to uneven freezing and poor quality.
Following these tips will ensure that your sourdough bread remains fresh and flavorful even after being frozen.
Making the Most of Your Frozen Sourdough
Once you have successfully frozen and defrosted your sourdough bread, there are many ways to enjoy it. Here are a few ideas:
French Toast: Use defrosted slices of sourdough to whip up delicious French toast, perfect for a weekend brunch.
Grilled Cheese: Make a gourmet grilled cheese sandwich using your thawed sourdough for an added depth of flavor.
Bread Pudding: Revive leftover slices of sourdough in a sweet or savory bread pudding. This will make a delightful dessert or brunch dish.
By incorporating your defrosted sourdough into these tasty dishes, you can enjoy the full potential of your baked goods.

Freezing sourdough bread can be a game changer for those who love this artisanal treat. It allows you to enjoy the time and care you put into making it, ensuring that none of it goes to waste. Whether you're baking for a family gathering or just for yourself, knowing how to freeze sourdough bread properly will enable you to savor every slice.
Final Thoughts
Sourdough bread doesn’t have to be a fleeting delight. With the right methods for freezing and thawing, you can keep enjoying your favorite loaves long after baking day. Now that you understand the steps, why not give it a try? Visit this link for further information on how to freeze sourdough bread and start your journey to delightful, preserved loaves today.
The Secret
The secret here is our slow-infused garlic oil - it gives you that deep, mellow garlic flavor without any of the harshness. Store-bought just can't compare to the gentle infusion process we use here on the homestead.
This recipe feeds a family of four generously and costs under $5 to make. Perfect for those nights when you want something special but don't have hours to spend in the kitchen.
Blessings from our kitchen to yours,
Mary & Family
Mother's Love Homestead
P.S. - This pairs beautifully with our sourdough bread for dipping! Check out our fresh loaves at www.hotplate.com/motherslovehomestead or grab our sourdough guide at https://amzn.to/3Gv9qBV
Notes


1
Get your spaghetti cooking in well-salted water.
2
While that's going, gently warm our garlic oil in a large skillet.
3
Add your fresh garlic slices and red pepper flakes - let them sizzle softly.
4
Save a cup of that starchy pasta water before draining.
5
Toss everything together with the parsley and cheese.
6
Season and serve immediately. SO SIMPLE!
Instructions
1lb Spaghetti
1/3 Cup Mother's Love Homestead Garlic Infused Olive Oil
1/4 tsp red pepper flakes
1/2 cup Fresh Parsley Chopped
4-6 Fresh Garlic Cloves thinly sliced
Salt & Pepper to Taste
1/2 cup grated Parmesan cheese
Homestead Garlic Oil ~ Spaghetti Aglio e Olio
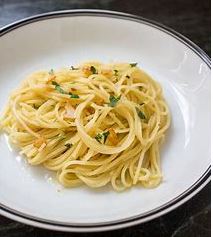
Mary Chadd

Homestead Garlic Oil ~ Spaghetti Aglio e Olio
Hey there, friend!
It's that time of evening again - you're staring into the pantry wondering what magic you can create for dinner, right? I've been there so many times!
This week, I want to share one of my favorite ways to use our garlic-infused olive oil. It's a beautiful Italian pasta dish that sounds fancy but is, in fact, one of the simplest things you can make. My family asks for it at least once a week now!
4 Servings
813 Calories / Serve
Prep Time
5min
Cook Time
10min
Rest Time
0
Total Time
15 min


Comments